Dutch braiding, sometimes referred to as reverse braiding or inside-out braiding, is a common braiding method that entails weaving three strands of hair together. Dutch braiding is a versatile hairstyle that can be worn in a variety of ways, from a simple ponytail to an intricate updo. With a bit of practice, you'll be able to create beautiful Dutch braids in no time! Here’s a Dutch braid tutorial for beginners to begin with.
- Divide a section of hair at the top of your head into three equal strands. The left strand, middle strand, and right strand.
- Cross the left strand under the middle strand so that it becomes the new middle strand.
- Cross the right strand under the new middle strand so that it becomes the new middle strand.
- Add a small section of hair to the left strand, then cross it under the new middle strand.
- Add a small section of hair to the right strand, then cross it under the new middle strand.
- Repeat steps 5-6, adding small sections of hair to the left and right strands each time, until you reach the nape of your neck.
- Once you've reached the nape of your neck, continue braiding the rest of your hair in a regular three-strand braid.
As it is a Dutch braid for beginners, once you practice and perfect this, it will be easy to move on to more complicated versions of the braid and have fun with various combinations.

Source Url: gogole.com
Related Story : Everything You Need to Know About Short Hairstyle Tutorials
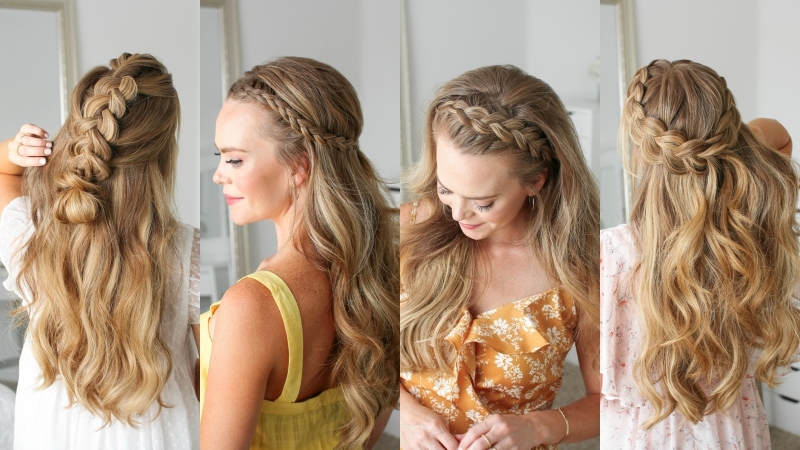
How to Create Fun and Creative Styles with Dutch Braids?
Here is a variety of interesting Dutch braid tutorials to experiment with after mastering the simple Dutch braid.
1: Double Dutch braid tutorial:
2: Double Dutch braids are a popular and stylish way to wear your hair. Here's a step-by-step tutorial on how to create double Dutch braids.
3: Divide your hair into two equal sections down the middle of your head using a comb.
4: Take one section and divide it into three equal sections at the top of your head. These will be the starting strands for the first braid.
5: Start by crossing the left strand under the middle one, then crossing the right strand under the new middle strand.
6: Add a small section of hair to the left strand, then cross it under the new middle strand.
7: Add a small section of hair to the right strand, then cross it under the new middle strand.
8: Continue braiding, adding small strands of hair to each strand as you go, until you reach the nape of your neck.
9: Once you've reached the nape of your neck, continue braiding the rest of your hair in a regular three-strand braid.
10: Repeat steps 3-9 for the second braid on the other side of your head.
11: To finish the look, wrap each braid around the top of your head and secure them with bobby pins.
5 Common Mistakes to Avoid When Doing a Fishtail Braid Tutorial
Want to learn how to create a stunning fishtail braid? Our "Fishtail Braid Tutorial" is perfect for beginners and experts alike. With easy-to-follow steps, you'll be weaving this gorgeous style in no time. Plus, it's a versatile look that works for any occasion. Whether you're headed to the office or a night out with friends, this braid will add a touch of elegance to your look.
1: Pull all of your hair to one side, then divide it into two equal sections.
2: Take a small section of hair from the outer edge of the left section and cross it over to the right section.
3: Repeat step 3, taking a small section of hair from the outer edge of the right section and crossing it over to the left section.
4: Continue braiding, alternating sides, and taking small sections of hair from the outer edge of each section, until you reach the end of your hair and tie it in place.

Source: istockphoto.com
The Crown Braid: A Versatile Hairstyle for Any Occasion
Looking for a hairstyle that's both elegant and simple? Look no further than our Crown Braid tutorial. We'll teach you how to create a beautiful braid that's perfect for any occasion, without spending hours in front of the mirror. Join us now and let's create a stunning look that will leave your friends and family in awe. Crown braids are a beautiful and elegant way to wear your hair. Here's a step-by-step tutorial on how to create a crown braid.
1: Take a section of hair at the front of your head, near your forehead, and part it into three equal sections.
2: Begin braiding the section by crossing the right strand over the middle strand, then crossing the left strand over the new middle strand.
3: Add a small section of hair to the right strand, then cross it over the new middle strand.
4: Add a small section of hair to the left strand, then cross it over the new middle strand.
5: Continue braiding, adding small sections of hair to each strand as you go, until you reach your ear.
6: Stop adding hair to the braid once you reach your ear and continue braiding in a conventional three-strand braid until the end.
7: Repeat steps 2 to 8 on the other side of your head.
8: Take one braid and wrap it across the back of your head, securing it with bobby pins.
9: Take the other braid and wrap it across the back of your head, tucking it underneath the first braid and securing it with bobby pins.
10: Use additional bobby pins as needed to secure the braids and create a flawless, crown-like effect.
Similar Story : 20 PRODUCTS TO HELP MAINTAIN YOUR HAIR
Tips & Tricks for Perfecting Your Dutch Braid in No Time
1: Start with clean, brushed hair to make the braiding process smoother.
2: Make sure that you take three equal strands and not uneven divisions.
3: Keep your tension tight throughout the braid to prevent it from becoming loose or messy.
4: Practice regularly to improve your braiding technique and speed.
5: Use hairspray or bobby pins to secure any loose sections.
By following these tips and practicing regularly, you'll be able to perfect your Dutch braid in no time!
Written by- Ananya Majumdar